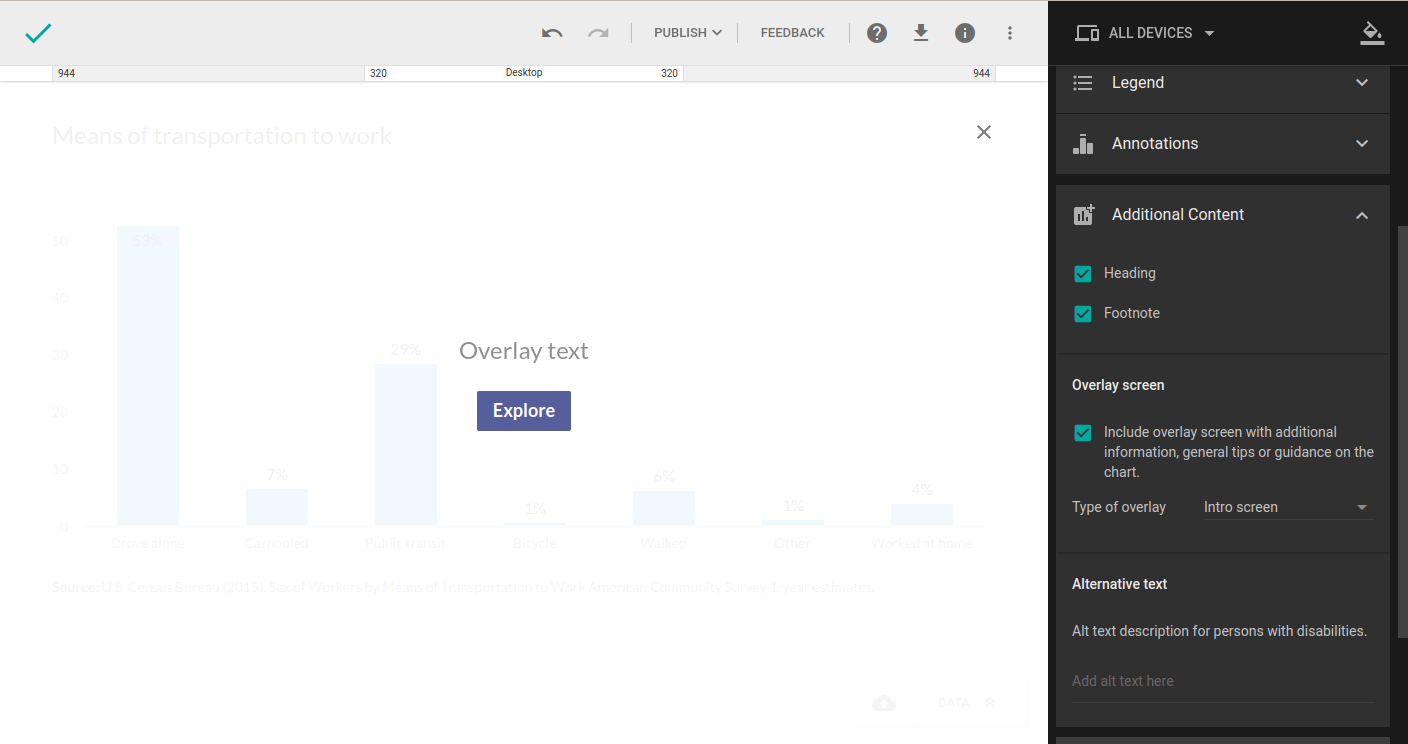
Add additional content
Many charts tend to be easy to understand and even complex charts are straightforward if you include a legend. However, there are charts in which additional content is rather warranted. In this guide, we’ll focus on the additional content, namely textual content, and a few scenarios when it’s necessary. In charts, the text is used to:
-
Introduce
-
Label
-
Explain
-
Emphasize
-
Point out
In Charts, most of the textual content is available under the Additional Content section.
-
In the upper-right corner, click EDIT.
-
Click Additional Content to expand the section.

Heading
A good heading, or a title, is vital, and it should clearly communicate to your audiences what your chart is about. However, try to avoid lengthy headings. Your title should explain what your audiences can expect to find in your chart. To start, where applicable, you’ll want to include the variables being visualized and the year the data was collected. Now, let’s go ahead and add a heading.
-
In the Additional Content section, check the box next to Heading.
-
At the top of the chart, click the heading field.
-
Enter the heading.
Charts allow you to format the heading text. You can make the title (or just a part of it) bold or italic, turn it into a hyperlink, center it, and change its size. Advanced heading settings can be accessed in theme editor. Head over to our theme guide to find out everything you need to know.

Subheading
The heading, unlike footnotes, supports two different font sizes. When creating a theme, you can set two heading styles: normal and large. If necessary, you can set a smaller font size for the normal heading and use it for the introductory paragraph, and the large heading for the actual title.
Footnote
Footnotes are used to provide additional information and can cover anything from sources, bibliographical information, explanatory information, expansion on a specific idea or thought, to background information. Bear in mind, though, that footnotes are by default smaller and lighter text, so you’ll want to avoid using long footnotes, as they might end up being difficult to read.
-
In the Additional Content section, check the box next to Footnote.
-
At the bottom of the chart, click the footnote field.
-
Enter the footnote.
Charts allow you to format the footnote text. You can make the title (or just a part of it) bold, italic, turn it into a hyperlink, and center it. Advanced footnote settings can be accessed in theme editor. Head over to our theme guide to find out everything you need to know.

Overlay screen
Writing a title and an introductory sentence isn’t always enough to explain your chart to readers. Overlay text, as the name suggests, is displayed on an overlay screen right on top of the chart. You can add additional information, general tips, and guidance on the chart itself to help your readers get around. There are two different types available:
- Help
- Intro screen
Help
Help is triggered when the user clicks the help icon at the top of the chart they’re viewing. Let’s try and set up a Help overlay screen.
-
In the Additional Content section, check the Include overlay screen box to enable the overlay screen.
-
From the Type of overlay dropdown, select Help.
-
In the chart preview, click the help icon
.
-
Click on Overlay text field, type in the text you want to be displayed.
Overlay screen supports text formatting [link] so you can play with font size, justification, and even include a hyperlink.
-
Click X to apply the changes and return to your chart.
Help will be displayed when the reader clicks the help icon at the top of the chart.
Intro screen
Intro screen is automatically displayed when your chart is loaded.
-
In the Additional Content section, check the Include overlay screen box to enable the overlay screen.
-
From the Type of overlay dropdown, select Intro screen.
-
In the chart preview, click the help icon
.

-
Click on Overlay text and type in the text you want to be displayed.
Overlay screen supports text formatting [link] so you can play with font size, justification, and even include a hyperlink.
-
Click X to apply the changes and return to your chart.
Intro screen will be displayed at the moment when the chart is loaded. You can activate it again by clicking on the help icon at the top of the chart.

Alternative text
Specifying alternative text in your charts is a basic principle of web accessibility. Visually impaired members of your audience using screen readers will read the text you specify to better understand the context and the message you’re trying to convey. This text will also be displayed in case the browser fails to load your chart. Let’s check out how you can add alternative text to your chart:
-
In the Additional Content section, locate the Alternative text section.
-
Type in the text in the alt text field.
-
Click away to apply the changes.
